(3)
Remove two locknuts (4), flatwashers (5),
and bolts (6) securing each bearing (7) to chain adjuster
(8) and feedshell (9). Discard locknuts.
(4)
Loosen
two
setscrews
(10)
in
each
bearing (7).
(5)
Loosen setscrew (11) in sprocket (12).
(6)
Drive out shaft (13) and remove sprocket
(12), chain adjuster (8), and two bearings (7).
(7)
Remove bolt (14) and jam nut (15) from
chain adjuster (8).
(8)
Remove lubrication fitting (16) from each
bearing (7).
b.
Installation.
(1)
Install lubrication fitting (16) in each
bearing (7).
(2)
Screw jam nut (15) onto bolt (14) and
install bolt in chain adjuster (8). Do not tighten jam nut
against chain adjuster.
NOTE
Ensure that chain adjuster is installed
correctly. Chain adjuster should be
installed so that holes for shaft are
closer to front (drifter side) of feedshell.
(3)
Slide chain adjuster (8) over top of
feedshell (9).
(4)
Position sprocket (12) in feedshell (9) and
install shaft (13) through chain adjuster (8), feedshell,
and sprocket. Ensure that sprocket is centered on shaft.
(5)
Tighten setscrew (11) in sprocket (12).
NOTE
Bearing
on
control
valve
side
of
feedshell
must
be
installed
with
lubrication fitting to rear.
(6)
Install bearing (7) on each end of shaft
(13).
(7)
Secure each bearing (7) to chain adjuster
(8) and feedshell (9) using two bolts (6), flatwashers (5),
and new locknuts (4). Do not fully tighten locknuts.
(8)
Tighten two setscrews (10) in each
bearing (7).
(9)
Ensure that drive chain (3) properly
engages all sprockets. Install master link (2) and secure
with four new cotter pins (1).
(10)
Lubricate bearings (LO 5-3820-241-12).
(11)
Adjust chain (see paragraph 5-13).
5-15.
Feed Chain Sprockets, Bearings, and Shafts
Replacement
NOTE
This procedure is for the lower and
middle sprockets, bearings, and shafts.
If the upper sprocket, bearings, or shafts
require replacement, see paragraph 5-
14.
Middle sprocket is illustrated. Procedure
is identical for lower sprocket.
a.
Removal.
(1)
Fully loosen chain (see paragraph 5-13).
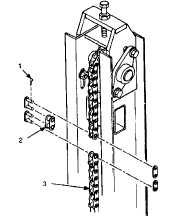
(2) Remove four cotter pins (1) from one of the master
links (2) on drive chain (3). Remove master link.
Discard cotter pins.
19