TM 5-2590-512-13&P
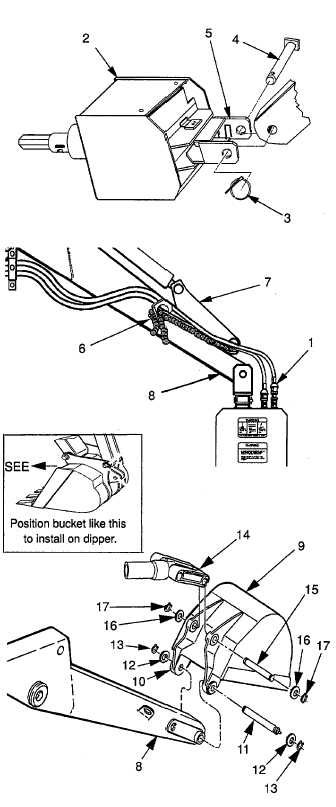
c. Remove Auger Drive Unit.
WARNING
Hydraulic Pressure remaining after
SEE engine is off could cause
unexpected anger rotation resulting
in serious injury or death.
Depressurize system by shutting off SEE engine
and operating auger controls thru full range of
motion.
1.
If necessary, remove hoses at quick
disconnect fittings (1). Use rags to catch
and clean fittings.
2.
Place Auger Drive Unit (2) on floor.
3.
Remove lynch pin (3), and link pin (4). Pull
Auger Drive Unit (2) away from dipper arm
or start SEE engine and guide operator to
move dipper end (8) away from Auger Drive
Unit (2).
4.
Install link pin (4) and lynch pin (3) on
connecting link (5) for storage.
d. Install Bucket.
1.
Untie rope (6) holding bucket control linkage
(7) to the dipper (8). Store rope (6) in SEE's
tool box.
2.
Use a suitable lifting device, or move SEE
boom and dipper, and position bucket (9) at
rear of SEE vehicle dipper as shown.
3.
Start SEE engine and guide operator to
position dipper end (8) into bucket mounting
bracket (10).
4.
Visually align dipper hole with bucket
mounting bracket (10). Signal SEE operator
to stop dipper movement. Install rod (11)
and washers (12).
NOTE
Use snap ring pliers, supplied with
kit, to install retainer rings (13) and
(17).
5.
Install two retaining rings (13) into slots at
ends of rod (11).
6.
Position spacer (14) into place on bucket
bracket and align holes through links and
spacer (14).
7.
Install washer (16) and retaining ring (17) on
one end of pin (15). Insert pin (15) into
place.
8.
Add washers (16) to shim clearances until
retaining ring groove on end of pin (15) is at
edge of last washer.
9.
Install retaining ring (17) on end of pin (15).
4-16


