NOTE
Scribe feed motor and quill motor flange to en-
sure proper reassembly.
(3)
Remove four screws (2) and lockwashers (3) se-
curing feed motor (4) to quill motor flange (5). Remove
feed motor and key (6). Discard lockwashers.
(4) Remove four screws (7) and flatwashers (8).
Remove fan cover (9).
(5)
Hold quill shaft (10) in place and remove screw
(11) and lockwasher (12) securing fan (13) to quill shaft.
Remove fan. Discard lockwasher.
NOTE
Gaskets on gearbox covers are laminated. Record
thickness of gaskets after removing. Use the same
thickness when installing gearbox covers.
(6)
Remove six screws (14) and lockwashers (15).
Remove cover (16) and gasket (17) from housing (18). Dis-
card lockwashers and gasket.
(7)
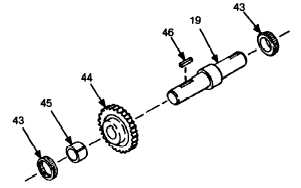
Remove shaft (19) from housing (18).
NOTE
Gaskets on gearbox covers are laminated. Record
thickness of gaskets after removing. Use the same
thickness when installing gearbox covers.
(8)
Remove four screws (20) and lockwashers (21).
Remove fan brackets (22), cover (23), and gasket (24) from
gear housing (18). Discard lockwashers and gasket.
(9)
Remove four screws (25) and lockwashers (26).
Remove quill motor flange (5) and gasket (27) from gear
housing (18). Discard lockwashers and gasket.
(10) Block gear housing (18) with fan end facing up.
(11) Remove retaining ring (28) from quill shaft
(10).
(12) Press out quill shaft (10), removing two bear-
ings (29 and 30) and two cups (31 and 32) when shaft is free.
(13) Remove and discard oil seal (33) from cover
(23).
(14) Remove and discard oil seal (34) from quill mo-
tor flange (5).
(15) Remove and discard oil seal (35) from cover
(16).
NOTE
Gaskets on gearbox covers are laminated. Record
thickness of gaskets after removing. Use the same
thickness when installing gearbox covers.
(16) Remove six screws (36) and lockwashers (37).
Remove cover (38) and gasket (39) from housing (18). Dis-
card lockwashers and gasket.
(17) Remove retaining ring (40) from housing (18).
(18) Remove drain plug (l), pipe plug (41), and
plug (42) from housing (18).
vent
b. Inspection.
WARNING
Dry cleaning solvent P-D-680 is toxic and flam-
mable. Wear protective gloves and use in a well
ventilated area. Avoid contact with shin, eyes, and
clothes and do not breathe vapors. Do not use
near open flame or excessive heat. The flash
point is 100-138 degrees F (38-50 degrees C). If
you become dizzy while using cleaning solvent,
get fresh air immediately and get medical aid. If
contact with eyes is made, wash your eyes with
water and get medical aid immediately.
(1)
Clean and inspect bearings (43) on shaft (19) in
accordance with TM 9-214. If replacement is required,
press out shaft or remove bearings using bearing puller.
Press new bearings onto shaft.
(2)
Inspect worm gear (44) for cracked, chipped, or
broken teeth. If replacement is required, press out shaft
(19) and remove bearings (43), spacer (45), worm gear, and
key (46). Install key, new worm gear, and spacer on shaft,
then press on two new bearings.
(3)
Inspect quill shaft (10) for stripped or damaged
threads. Replace if damaged.
(4)
Clean and inspect bearing cups (47) in covers
(16 and 38) in accordance with TM 9-214. Remove and in-
stall new bearing cups if required.
(5)
Inspect all parts for cracks, breaks, and other
signs of damage. Replace all damaged parts.
c. Assembly.
(1)
Install vent plug (42), pipe plug (41), and drain
plug (1) in gearbox housing (18).
(2)
Install retaining ring (40) in gear housing (18).
(3)
Install cover (38) and new gasket (39) on hous-
ing (18) using six screws (36) and new lockwashers (37).
(4)
Insert quill shaft (10) from air motor side of
gear housing (18).
(5)
Turn gear housing (18) so that fan side is up.
13


